You can change the read receipt setting on your iPhone 13 by going to Settings > Messages > and tapping the button next to Send Read Receipts.
Our guide continues below with additional information about this topic, including an explanation of what a read receipt is, as well as more detailed information about how you can modify this setting on your device.
Introduction
Let’s dive right into it, shall we?
The iPhone 13, like its predecessors, has a plethora of features that aim to provide users with a seamless and intuitive experience. Among these features, one that has been a topic of much discussion (and sometimes contention) is the read receipt in iMessage.
Now, you might be wondering, “What exactly are read receipts?” or perhaps you’re well-acquainted with them but aren’t certain how they function on the iPhone 13 specifically. Either way, by the end of our chat, you’ll be able to handle this feature with the same confidence that a seasoned pilot handles an aircraft. Let’s get started!
A Brief Overview of Read Receipts
Before diving into the intricacies of turning on and off the read receipts, let’s get a grip on what they are and their purpose.
Read receipts are those tiny notifications that inform the sender when the recipient has read their message. Yes, that little timestamp you see below your message in iMessage? That’s the one! It’s a simple yet powerful feature that offers transparency in communication.
But with great power comes great responsibility, doesn’t it? The debate about whether or not to have read receipts turned on has been endless. Some find them to be incredibly useful as they can gauge the engagement level of the other person. However, others find them invasive, feeling pressured to reply immediately once a message is read.
It’s all about individual preferences. And that’s the beauty of it! Apple gives you the choice, and by the end of our guide, you’ll know precisely how to exercise that choice on your iPhone 13.
Setting the Stage – Accessing the Right Menu
You can’t play with read receipts if you don’t know where to find them, right? So let’s make our way there.
You can also check out this video about how to turn off read receipts on iPhone 13.
Step 1: Start by unlocking your iPhone 13.
Glance at it, and let Face ID do its magic, or manually enter your passcode.
Step 2: From your home screen, find and tap on the ‘Settings’ app.
You can’t miss it; it’s the one with the gear icon.
Step 3: Scroll down a bit and tap on ‘Messages.’
This is the epicenter of all things related to messaging on your iPhone, and it’s where we’ll be spending most of our time today.
You’re doing great so far! Remember, this is just like any other setting on your iPhone. It’s user-friendly and intuitive.
Now that you’re in the ‘Messages’ settings:
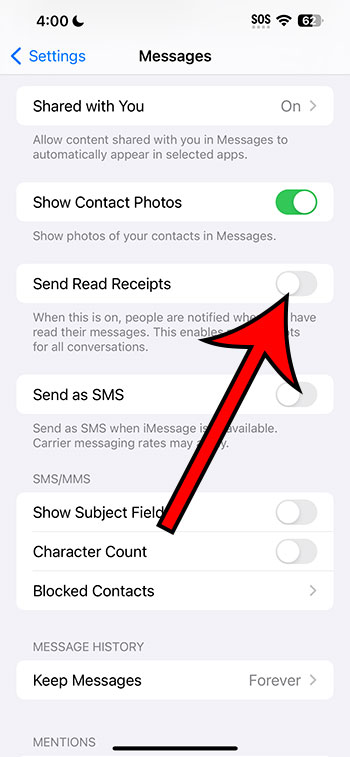
Step 4: Look for the ‘Send Read Receipts’ option.
If you’ve been using iPhones for a while, it should look familiar. If not, no worries! You’re learning now.
- Toggle the switch! It’s as simple as that:
- If the switch is green, the read receipts are ON. This means when you read someone’s message, they’ll know.
- If it’s gray, the read receipts are OFF. Read in peace, without anyone being the wiser.
Easy, right? But wait, there’s a little more depth to it!
Individual Conversations – A Finer Control
Did you know that the iPhone 13 allows you to customize read receipts for individual conversations? This means you can have them turned on for your best friend, but off for that colleague who keeps sending you memes during work hours.
Here’s how to fine-tune your read receipt settings:
- Open the ‘Messages’ app and go to any conversation.
- Tap on the contact name or number at the top.
- Tap on ‘info’ (it looks like an “i” inside a circle).
- Here, you’ll see a ‘Send Read Receipts’ option just for this particular chat. Toggle it as per your preference.
Isn’t that something? It’s like having a special VIP list, but for read receipts!
Related: How to Turn Off Location on iPhone 13
The Implications – Why This Matters
Understanding the implications of read receipts will help you decide when and for whom to have them turned on or off. Remember:
- Transparency: With read receipts on, you’re transparent about when you’ve seen a message. It’s like nodding in acknowledgment during a face-to-face conversation.
- Accountability: On the flip side, it could mean you’re accountable to reply, especially if someone knows you’ve read their message. This can be both a pro and a con, depending on the situation.
- Balance: The iPhone 13’s ability to customize read receipts for individual chats strikes a beautiful balance between transparency and privacy. Use it wisely.
Video About iPhone 13 Read Receipts
Frequently Asked Questions
Over the years, I’ve noticed that users often have a few common questions regarding read receipts. Let’s address them:
- What if both the sender and I have our read receipts turned off?
- In this case, neither party will see when the other has read a message. It’s mutual invisibility.
- Does turning off read receipts also disable delivery receipts?
- No, turning off read receipts won’t affect delivery receipts. The two are independent of each other.
- If I turn off read receipts, read a message, and then turn them back on, will the sender see that I’ve read their message?
- No, the sender will not see a read receipt for messages you read while the feature was turned off.
Conclusion
By now, you should feel like the master of read receipts on your iPhone 13. It’s just one of those features that, once you get the hang of, feels second nature.
Remember, the key is to use the feature in a way that complements your communication style and preferences. And with the iPhone 13’s easy-to-navigate interface and settings, you’re in complete control.
Go forth, and communicate with confidence!