You can change the AirDrop setting by going to Settings > General > AirDrop and choosing an option there. You can then tap the Share button inside of an app and select an AirDrop contact.
Our guide continues below with additional information about using the AirDrop setting.
Introduction
Hey there! So, you’re interested in diving into the magic that is AirDrop on your iPhone? Fantastic choice! You’re about to discover one of the most convenient features Apple has integrated into its devices. And trust me, once you start using AirDrop, there’s no going back. It’s like discovering a secret handshake – but for your tech.
Before we begin, let’s get a quick overview. What exactly is AirDrop? It’s Apple’s seamless method of transferring files between nearby Apple devices. Think of it like throwing a paper airplane from one device to another, except the airplane is your file, and it travels at the speed of light (almost).
Using the iPhone AirDrop Feature
The steps in this article were performed on an iPhone 14 Plus in iOS 17.
These steps will also work on other modern versions of iOS and many other iPhone models, including the following:
- iPhone 14
- iPhone 14 Pro
- iPhone 14 Pro Max
Setting the Stage: Ensuring Your Device is AirDrop Ready
First things first. For AirDrop to work, both sender and receiver devices need to have Wi-Fi and Bluetooth turned on. It also utilizes location services, but don’t fret; it’s just to see nearby devices. Your actual location isn’t stored or shared. Oh, and make sure both devices are within 30 feet of each other. AirDrop’s impressive, but it’s not that far-reaching!
Related: How to Disable iPhone 14 Vibration
Accessing AirDrop
To find AirDrop:
- Swipe into the Control Center. If you’re using an iPhone X or later, swipe down from the top-right corner of your screen. If you’re on an iPhone 8 or earlier, swipe up from the bottom of your screen.
- You’ll see a panel with icons for Airplane Mode, Wi-Fi, Bluetooth, and Cellular Data. If you press firmly (3D Touch) or hold down (Haptic Touch) in the middle of this panel, another layer will expand below with more icons, including AirDrop.
- Alternatively you can go through the Settings menu at Settings > General > AirDrop.
You can also watch this video about the iPhone AirDrop setting for more information.
Setting Up Your AirDrop Preferences
Upon clicking on the AirDrop icon, you’ll see three options:
- Receiving Off: This means no one can send you files via AirDrop. Perfect if you’re not in the mood for any digital paper airplanes.
- Contacts Only: Only your contacts can send you files. Great for keeping things a bit more private.
- Everyone for 10 Minutes: As the name implies, anyone nearby can send you files. Use this when transferring files with someone not in your contacts, but have your phone turn it off automatically after a few minutes so that your phone isn’t open to receive files from anyone else nearby that has an iPhone!
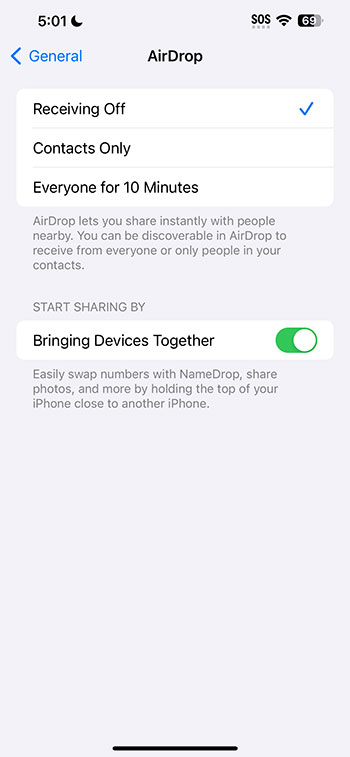
Note that there is also an option here for Bringing Devices Together that you could also use on compatible devices to share files and information as well.
Sending Files Using AirDrop
Found that hilarious meme or a picture-perfect snap you just have to share? Here’s how:
- Head to the app where your file is. For this example, let’s say it’s a photo in your Photos app.
- Click on the share button (that little square with an arrow pointing up).
- If the person (or their device name) you want to share with shows up in the AirDrop section, just tap on their name. If they’re set up to receive, they’ll get a notification asking if they want to accept the file. Once they accept, voila! The file magically appears on their device.
Receiving Files with AirDrop
When someone sends you a file, a notification will pop up on your screen. You can accept or decline the file. If you accept, the file will open in the appropriate app. So, a photo will open in the Photos app, a location in Maps, and so on.
Troubleshooting AirDrop
Sometimes, technology plays hard to get. If you’re having trouble:
- Double-check both devices have Wi-Fi and Bluetooth enabled.
- Make sure both devices are close enough.
- Check AirDrop settings. If both devices are set to “Contacts Only,” ensure both parties have each other’s contact information saved.
- Sometimes, a simple restart of the device can solve the problem (the age-old “turn it off and on again” trick).
A Word on Security
Let’s chat about safety for a sec. AirDrop uses Bluetooth to create a peer-to-peer Wi-Fi network between devices. Files are encrypted during transfer, making it super secure. However, always ensure you’re sending or receiving files from known and trusted sources. And regularly check your AirDrop settings, especially if you had it set to “Everyone” during a previous transfer.
Beyond iPhones: AirDrop with Macs and iPads
One of the beautiful things about AirDrop is its ability to work across the Apple ecosystem. Got a Mac or an iPad? You can use AirDrop there too! The process is pretty similar, so you’re already well on your way to becoming an AirDrop master across all your Apple devices.
Video About AirDrop on an iPhone
Summary – How to Change the iPhone AirDrop Setting
- Open Settings.
- Select General.
- Choose AirDrop.
- Select an option.
Conclusion
There you have it! The wide world of AirDrop, explained just for you. Remember, like any tool, the more you use it, the more comfortable and efficient you’ll become. So go ahead, start “airdropping” those files and enjoy the convenience. Happy sharing!