Recording your screen on the iPhone 14 is simple and convenient. Add the screen recording function to your Control Center, access it with a swipe and a tap, and you’re ready to go! This guide walks you through each step, from setup to sharing, with tips and tricks for a seamless experience.
You can also check out this video about how to screen record on iPhone 14 for more on this subject.
Ever found yourself in a situation where you needed to capture something happening on your iPhone 14 screen? Maybe you’re trying to save a memorable conversation, create a tutorial, or record a gaming achievement. Whatever the reason, recording your screen can come in super handy! And guess what? It’s easier than you might think.
Getting Started
First things first, you need to make sure your iPhone 14 is updated to the latest version of iOS. This ensures that you have all the necessary features and security updates. Once that’s taken care of, you’re ready to roll!
Related: How to Screen Record on an iPhone
Setting Up Screen Recording
Before you can start recording, you need to add the screen recording feature to your Control Center. This is like your toolkit for quick access to various functions on your iPhone.
- Open the “Settings” app.
- Scroll down and tap on “Control Center.”
- Look for “More Controls” and find “Screen Recording.”
- Tap the plus icon next to “Screen Recording.”
Voila! You’ve successfully added the screen recording function to your Control Center.
Ready, Set, Record!
Now that everything is set up, you’re ready to start recording.
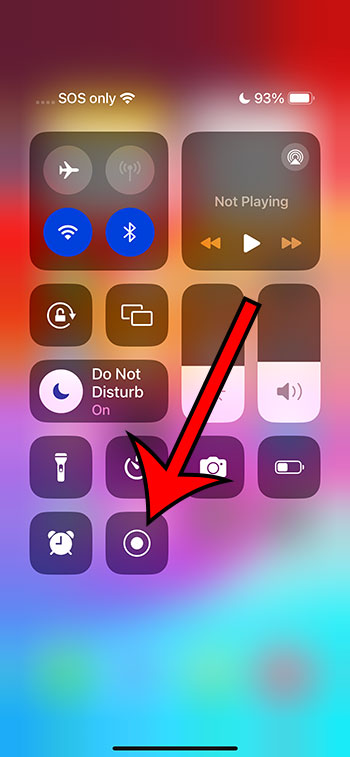
- Swipe down from the top-right corner of your screen to access the Control Center.
- Find the screen recording icon (it looks like a circle within a circle) and give it a long press.
- A countdown will begin, giving you three seconds to get ready.
- After the countdown, your screen recording will start.
And that’s it! You’re now recording everything happening on your screen.
Recording Audio
Want to add some commentary or background sound to your recording? No problem!
- Access the Control Center and long press the screen recording icon.
- Tap the microphone icon to turn it on. This will capture both the phone’s internal audio and external audio from the microphone.
- Press “Start Recording.”
Now, your screen recording will include audio as well.
Stopping the Recording
Done recording? Here’s how to stop:
- Tap the red time indicator at the top of your screen.
- Press “Stop.”
Your screen recording will automatically be saved to your Photos app.
Editing Your Screen Recording
Got some unnecessary parts in your recording? You can easily trim it right in the Photos app.
- Open the Photos app and find your screen recording.
- Tap “Edit.”
- Use the sliders to trim the beginning or end of the video.
- Press “Done.”
Sharing Your Screen Recording
Want to show off your screen recording to the world? Sharing is a breeze.
- Go to the Photos app and select your screen recording.
- Tap the share icon (it looks like a box with an arrow).
- Choose how you’d like to share the video (message, mail, social media, etc.).
Related: iPhone 13: How to Record 4K Video
Pros and Cons of Screen Recording on iPhone 14
Pros:
- Convenience: Screen recording on the iPhone 14 is super convenient. You can access it quickly through the Control Center, and it doesn’t require any third-party apps.
- Built-in Editing: You can trim your screen recording right in the Photos app, without needing extra software.
- Audio Recording: The option to record audio along with your screen recording adds an extra layer of usefulness.
Cons:
- Limited Editing Options: While you can trim your video, more advanced editing options aren’t available within the iPhone’s built-in tools.
- Storage Space: Screen recordings can take up a significant amount of space, especially if they’re long or if you record frequently.
- Potential for Overuse: Because it’s so easy to use, there’s a potential for overuse, which could lead to clutter in your Photos app and used-up storage space.
Video About iPhone Screen Recording
Final Thoughts
Recording your screen on the iPhone 14 is a breeze. Whether you’re making a tutorial, saving a digital keepsake, or capturing a gaming triumph, the built-in screen recording feature has got you covered. With the ability to record audio, trim your recordings, and share them effortlessly, it’s a versatile tool that’s right at your fingertips.
FAQs
- Can I record my screen and use other apps at the same time? Yes, you can navigate and use other apps while recording your screen.
- Is there a time limit for screen recording? There isn’t a specific time limit, but the length of your recording will be dependent on your available storage space.
- Can I record a phone call or FaceTime call with screen recording? No, screen recording doesn’t capture audio from phone or FaceTime calls.
- Where do my screen recordings get saved? All screen recordings are automatically saved to your Photos app.
- Can I record my screen with the phone locked? No, the screen needs to be unlocked and active to record.
Additional Information
Screen recording on the iPhone 14 can be a powerful tool for content creators, educators, and the average user alike. Its ease of use makes it accessible to everyone, while its integration with other iPhone features allows for a smooth user experience.
Beyond the basics, there are plenty of creative ways to use screen recording. From creating walkthroughs for apps, to saving snippets of a video call with a loved one, the possibilities are extensive. However, it’s important to use this tool responsibly and be mindful of privacy and consent when recording content from others.
With these tips and tricks, you’re now equipped to make the most out of your iPhone 14’s screen recording feature!