Want to remove the “Sent from My iPhone” signature? Open the Settings app, navigate to “Mail”, find the “Signature” option, edit or delete the text, and save your changes. Customize your emails to reflect your unique style.
This article continues below with more information about the iPhone signature, including pros and cons of this feature, as well as answers to some common questions.
You can also watch this video about how to remove sent from my iPhone for more on this topic.
Ah, the notorious “Sent from My iPhone” signature. We’ve all seen it. Heck, some of us have accidentally used it. While it may be handy for some to let recipients know they’re on the go, for others, it’s a slight annoyance or even a tad unprofessional. Don’t sweat it, though! We’ve got your back. By the end of this read, you’ll be saying bye-bye to that pesky signature.
Related: What an iMessage Sent as Text Message on iPhone Means
Understanding the Default Signature
Why does Apple even add this signature in the first place? Well, it’s like leaving a little calling card, reminding everyone about their brand. Kinda cool, right? But not if you’re aiming for that sleek, pro vibe in your emails.
A Quick Guide to Removing It
Let’s dive right into the steps:
1. Open the Settings App
No magic here. Find that gear icon on your home screen and give it a tap.
2. Scroll Down to “Mail”
You’ll see a bunch of options. Keep scrolling until you find the “Mail” option. Found it? Awesome!
3. Look for “Signature”
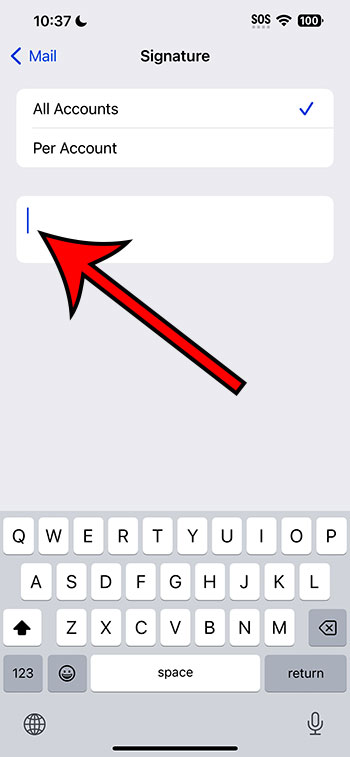
This is where the action happens. You’ll find a “Signature” option under the “Mail” settings. Yep, tap on that.
4. Time to Edit
You’ll see the default “Sent from My iPhone” text. Simply delete it and replace it with whatever your heart desires. Or leave it blank if you’re a minimalist.
5. Save Your Changes
Done editing? Great! Make sure to save any changes so that your new signature (or lack of one) takes effect.
Pros of Removing the Signature
- Professionalism: Your emails will look more polished and business-like.
- Customization: You can create a personal touch with a unique signature.
- Less Distraction: Without the default signature, your recipients focus more on your actual message.
Cons of Removing the Signature
- Lose the Excuse: Recipients won’t know you’re on the go, which can be a subtle excuse for any typos.
- Missed Branding: For Apple aficionados, the signature can be a fun touch.
- Takes Time: Okay, it’s only a few minutes, but still, it’s a few minutes!
Video About Removing the Signature
Additional Information
Did you know you can set different signatures for different email accounts on your iPhone? So, for your work email, you could have a professional sign-off, and for your personal one, maybe something fun like “Sent with a smile!” The possibilities? Endless!
Wrapping It Up
So there you have it! A step-by-step guide to reclaiming your email signature on your iPhone. Whether you choose to jazz it up with a personal touch or keep it neat and blank, you’re now in control. Email on, friends!
FAQs
- Can I set a unique signature for different email accounts on my iPhone?
- Absolutely! Each account can have its own flair.
- I followed the steps, but my signature isn’t changing. Why?
- Ensure you’ve saved the changes and try restarting your Mail app.
- Can I include links or images in my signature?
- Links? Yes! Images? Unfortunately, the iPhone Mail app doesn’t support that feature.
- Will changing the signature on my iPhone affect my email signature on other devices?
- Nope! It’s specific to the device you change it on.
- Is there a limit to how long my signature can be?
- Technically, no. But for the sake of your recipients, try to keep it short and sweet!